Light Swoosh
Here’s a quick test for a particle effect done in Fusion.
Music: “Dance of the Gypsy” by Jeris (feat. A.M. mews by MommaLuv SKyTower)
licensed under a Creative Commons license: creativecommons.org/licenses/by/2.5/
You can download the comp here. It demonstrates a few other things like linear gamma, lens flares and glows. You need the Time3D fuse from vfxpedia and the Krokodove plugins.
Lesser-Known Fusion Features
Made another video tutorial:
This one is a quick tour of a couple of lesser-known features in eyeon Fusion: changing the frame step size, proxy footage for loaders, hotkeys for roto, view and subview settings, local render queue, hardware status.
You might already know some of those “secrets”, but they pop up every now and then on forums so I thought I’d collect them into a small video.
Specular Highlights Compositing Reference
Welcome to the first installation of a series where I tell you how to improve your CGI/compositing by looking at frickin mother nature for reference.
Often CGI lacks that last bit of realism. In the case of outdoor surfaces it can be due to the lack of proper specular highlights. They require high sampling rates, they tend to flicker, but it pays off to spend some compositing effort on then – even if you ultimately paint and reproject them manually.
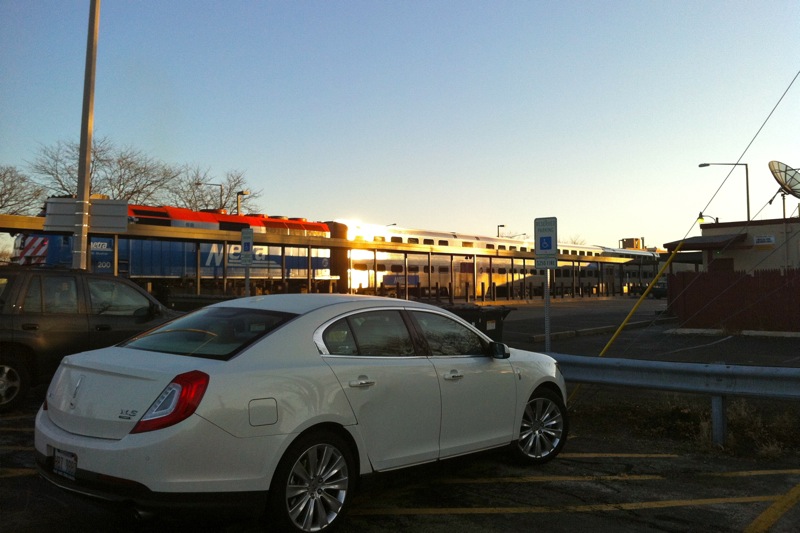
The key to realistic atmospheric effects are proper reference photos. Here’s a photo of one of Chicago’s commuter trains glistening in the morning sun:

The glow that seems to eat away from the steel roof looks like that because it comes from a reflection that’s magnitudes brighter than the rest of the image. To recreate this in comp you need to work in linear color space with values way above 1.0 and a sharp, super-bright yellowish reflection of the sun. Don’t be afraid to go up to 20 or even higher.
Now add a tiny blur to the image (the natural scattering of the air and the lens) so you hardly notice it on most of the image. The bright spot, however, will grow into a large glow not unlike one in the photo (then fine-tune your comp with different blur radii at different strengths or add a blurred luma key of the highlights once more).
Look at the car now. It’s parked in the shadows yet it doesn’t look murky or dark at all. It’s lit solely by the sky’s ambient light which is still bright enough to cause a lot of specular highlights. In reality – and from the point of view of an unbiased renderer like Arnold for example – there is no “specular pass” anyways. It’s all just tiny glossy reflections of a bright light source. And the sky is more than enough. I can’t tell you how to render rims like these but as a compositor you should be prepared to fake some highlights using a normal pass for example if the 3D lacks those details.
Some more thoughts about why the car in this picture looks so well-integrated (yeah, it’s real):
- The color of the highlights matches the sky. Especially the area around the front bumper turns into a mirror-like surface due to the Fresnel properties of the car paint. It matches the sky in color and brightness.
- The sun’s reflection on the train is so bright that it reflects once more in the car’s rooftop. Your raytracer would need to calculate at least two bounces!
- The wheels are black and you can hardly distinguish them from the car’s underside. Yes, clients would tell you they want to see the rubber if this were CGI. But try to balance it. Too much detail in the shadows would make this image look like one of those fake HDR images.
Keying Window Reflections, Smoke and Explosions
This post is about a keying technique that saved my ass on a couple of difficult shots recently.
Most keyers are all about pulling a matte from a green or blue screen plate which is then used to merge a despilled image onto the desired background. This technique has its limitations though and who doesn’t know the tedious task of combining and layering several keyers in different parts of an image until the result looks right.
There are, however, keying issues that are hard to get right even by combining multiple keyers: things like glass or glow. Both phenomena are additive in nature – they add light on top of what’s reflected from the green screen into the camera lens – which makes them different from semi-transparent things like smoke or motion blur. In compositing terms this means that there is no proper alpha value for them but since they change the color of the green screen behind them (reflections on a glass window are a good example) traditional keying algorithms will calculate an alpha value > 0 anyways.
The technique I’d like to demonstrate is simple. I didn’t invent it, by the way. I first came across it in a post from the Shake mailing list years ago but didn’t fully understand it. A compositing artist on “Vanilla Sky” (if I remember correctly) said that he pulled a soft matte and used it to push the color-corrected background through the foreground, preserving grain and fine hair.
These are the steps you need to take:
- Use a color difference formula to pull a soft matte, which is similar to despilling: use the difference between green and the average of blue and red, or the difference between green and the maximum of blue and red.
- Instead of manipulating that matte until it’s fully black and white, use it as it is to add the background image onto the (despilled) foreground image. This will lead to a strange low-contrast mix of foreground an background. But here’s the trick:
- Crank up the contrast of the background image until the result looks right. This of course only works in floating point since it requires pixel values outside the 0..1 range.
 This technique will preserve edges perfectly as well as glow, reflections or smoke up to a degree where the greenscreen is but a tiny green tint in the background. On the other hand, it will also “imprint” any imperfections of your green screen into the result: folds, shadows, tracking markers, uneven lighting. This means that you either need to do some serious cleanup work and degraining beforehand or combine this technique with traditional keyers (e.g. just for fine hair, or inside a window pane).
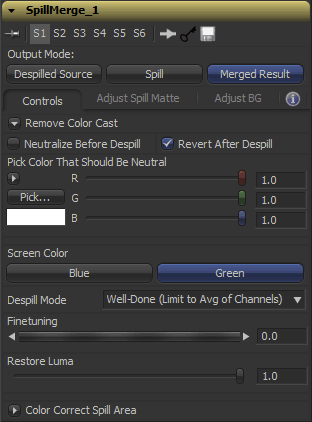
I’ve turned all of this into a handy Fusion macro. For Nuke, you can use the “Despill” gizmo from Luma Pictures, which served as an inspiration for the UI of my macro.
I’ve called the tool “SpillMerge” since it performs a despill first, then merges a background image into the despilled area (it basically treats the screen as a giant spill-affected area instead of trying to pull a solid black/white matte).
Download SpillMerge here or read the manual at vfxpedia.com.
VFX/Nuke Blog
I’ve just discovered that Jan Burda, a very talented compositing artist I’ve worked with in the past, has opened up his own blog. He has written some Nuke tutorials, so head over to his place and have a look!
Object Removal Video Tutorial
My next video tutorial for Fusion is online. It’s about removing objects (a shadow in this case) from a shot using a 3D matchmove, some scene geometry and automated white-balance matching. You can download the complete project and footage as well. Yeah, it’s a home video of mine but the technique has proven valuable on various shows already.
It can also be easily transferred to Nuke.
Related to this: freezing cameras for projection setups just got a whole lot easier with this script.
Also slightly related to this: on some other blog I’ve found a link to these vintage VFX educational videos. The whole thing has an 80s air to it but the names of the presenters should ring a bell 🙂 Well-known gurus like Ron Brinkmann and Stu Maschwitz are among them.
Object Removal Teaser
This is an old post. Head over to the final version of this tutorial.
I’m in the process of recording another video tutorial about camera projections. This time, I’ll demonstrate a real-life example of how to remove objects (a shadow on the ground in this case) from a shot. Ok, it’s a home video of mine, not a real shot from one of my projects. But I have employed this technique on actual shows and this shaky video of mine is much more challenging than a perfect film scan.
Here’s a preview:
