Dual GPU Passthrough on Proxmox
This post explains how I managed to pass through some old NVIDIA GTX1060 cards to two Rocky Linux VMs on Proxmox 9. One of those virtual machines is even able to make use of a local monitor and keyboard/mouse while the other VM will be for remote desktop access only. This was pretty straightforward in hindsight except that tutorials on the web were often a few years old and did different things, so I was unsure at first which pieces of advice were still valid.
Skip down to “How To” if you’re in a hurry.
In VFX studios people who usually are not working on beefy workstations might still have to play back 4K video or review full-resolution files (OpenEXR in our case). While mini PCs (HP EliteDesk, Zotac, Forum Mini and what not) with often just 16GB of RAM and onboard graphics are more than enough for some spreadsheet and database work, the playing back of video once or twice a day would really benefit from more power.
Setup
We had an old HP Z820 workstation around and old GPUs that were no longer up to the task for actual VFX work in Nuke. The workstation, however, has dual 16 core CPUs, 128 GB or RAM and server-grade hardware inside (I don’t get any money from HP for saying this but I like their workstations and we’ve been using refurbished models from Z800 to Z8G4). There’s enough room to fit 2 consumer-grade graphics cards from MSI in there and the PSU can handle them easily (each one needs a single 6-pin PCIe power cable).
I installed a default no-frills Proxmox PVE 9 on a 500 GB SSD which has enough space for two VM images that need to contain a full Rocky Linux 9 installation with a graphical desktop environment. Any smarter setups in terms of storage are beyond the scope of my tutorial.
How To
First, Proxmox itself needs to be modified a bit. It must not load any graphics drivers during its boot process as this would prevent the graphics cards from being passed through to a VM. It’s probably best to install all available system updates first and reboot in case of a kernel update. Check that you have both SSH access and that the Proxmox web GUI is working fine.
Create /etc/modprobe.d/blacklist.conf and enter these lines to prevent Proxmox from using these kernel modules:
blacklist nouveau
blacklist nvidia
Modify the GRUB_CMDLINE_LINUX_DEFAULT line /etc/default/grub (you can duplicate it and add a # in front of it to preserve the original line in case you want to undo this later):
GRUB_CMDLINE_LINUX_DEFAULT="quiet intel_iommu=on"Run update-grub afterwards!
IOMMU is Intel’s name for the feature that allows passing devices to VMs. It can only work if it is supported and enabled, which was true for an old machine like my HP Z820 workstation so it’s probably supported on all modern hardware (it’s called VT-d inside the HP BIOS).
Create /etc/modules-load.d/vfio.conf and add these lines to load some more required modules.
vfio
vfio_iommu_type1
vfio_pci
vfio_virqfd
Once this is done, you can reboot your Proxmox PVE and you’re done with meddling on the command-line. If you have a monitor connected it should stay blank and not show the Proxmox terminal login anymore.
Note:
The article I’ve mostly followed myself contains more information about IOMMU groups. It was not necessary to deal with this in my case, probably due to the good server-grade hardware I had.
VM Creation
Create a new Virtual Machine. The required settings for GPU passthrough are as follows:
- Graphic Card: Default
- Machine: q35
- BIOS: OVMF (UEFI)
- Add EFI Disk checked
- Pre-Enroll keys unchecked (important if you don’t want secure boot inside the VM which forces you to do some extra things to get the nvidia driver working. See this forum post.)
- SCSI disks, vCPUs and memory as you like. I’ve assigned half of my cores to each VM and a bit less than half the RAM each.
Once the VM is up and running you need to pass through the GPUs and optionally some peripherals. I’ve installed Rocky Linux 9 in it before doing the next steps but you can probably also continue right away. Just remember that the virtual browser-based console will stop working once you have passed the graphics card to the VM. If you are not in front of the host PC you should install Linux first.
Make sure the VM is stopped and go to the VM’s Hardware section. Click Add → PCI device. Select Raw device and pick your NVIDIA card from the list. I had 2 identical GPUs in my case and chose one for the first VM and the other for the 2nd VM. I’ve also checked the boxes for Primary GPU, All Functions, ROM-Bar and PCI Express. There’s probably also an audio device provided by the NVIDIA card. I didn’t pass it through as I didn’t need it.
To pass through a local USB keyboard and mouse connect the peripherals and click Add → USB Device. You should be able to pick the devices based on manufacturer or pipe through the raw USB port. The latter, however, was a problem for me as a reboot of Proxmox seemed to have jumbled the port IDs around. The device manufacturer’s IDs were safe but if you ever swap your keyboard it will need to be added to the VM again.
Inside the VM you should now see the NVIDIA device listed if you type “lspci”. You just need to install the drivers now which are available from the 3rd party repositories ELRepo (kmod-nvidia) and RPM Fusion (akmod-nvidia). After a reboot of the VM you can check nvidia-smi or btop to confirm that the GPU is actually working.
Nuke Autolabel Magic
Nuke has some powerful ways to define how nodes are labeled in the DAG. And they make for some fun ways to augment your gizmos. By default, Nuke ships with a script called autolabel.py which takes care of labeling all the nodes in various ways:
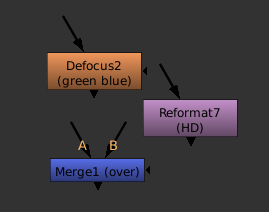
pictured: various autolabels
- the node’s name (obviously)
- a channel combo like “green blue” in case the node doesn’t simply process RGBA.
- the value of a node’s “output” knob, if such a knob exists (try adding one as a user knob to see this magic label)
- the current file name of a read node
- the merge mode of a merge node (sic!)
- the text of a node’s label knob
- and probably much more…
You can, however, write your own autolabel function for either a specific node or a whole class of nodes. The downside is that you lose all of the default autolabels if you don’t reimplement them yourself.
autolabel knob:
Every tool has a hidden knob called autolabel that can hold a Python expression. Its return value is used to label the node. So let’s see how this works. Create a node (mine’s called “Blur3” from now on) and open the scripting console panel. Type:
autoLabel = "abc"
nuke.toNode("Blur3")['autolabel'].setValue(autoLabel)
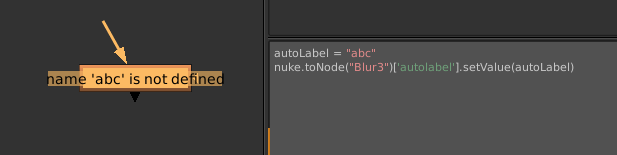
Of course this fails. But you see clearly that Nuke tries to execute your autolabel string as a Python expression. So let’s start with a basic example:
autoLabel = "nuke.thisNode().name()"
nuke.toNode("Blur3")['autolabel'].setValue(autoLabel)
This works. Note how the command nuke.thisNode() is used to refer to the node whose label is currently being processed. Just using the node’s name as a label is the most basic thing to do. As the presence of an autolabel string will override Nuke’s default behavior, you won’t get anything else that a blur node might usually have (channel info and custom label value). Also note how this label is only applied to “Blur3”. Any other blur nodes will continue to use Nuke’s default autolabel.py behavior. But these autolabel expressions can get more useful, complex and powerful:

Here I’m changing the label based on the value of another knob. Python doesn’t have the C-like syntax “expression ? yes : no” which would be really handy in this case. But it has something similar which I wasn’t aware of before a fellow TD showed this to me:
("some string" if expression else "another string")
This will help us build even more powerful autolabel expressions. Note how all of this is still one single string so I’m using single quotes inside it and I need to escape all newline characters as \\n. A single backslash would cause a line break in the code itself instead of the string. What’s still missing is the label knob which Nuke adds to all nodes by default. We need to implement this ourselves and it’s a bit tricky because you need to add a line break for this only if there actually is a label.
autoLabel = "nuke.thisNode().name() + (' big!' if nuke.thisNode()['size'].value()>100 else ' small') + ('\\n'+nuke.thisNode()\['label'].value() if nuke.thisNode()['label'].value() else '')"
nuke.toNode("Blur3")['autolabel'].setValue(autoLabel)

The further you go the more complex all of this gets. So why would you use the autolabel knob when Nuke has autolabel event handlers as well?
- the knob affects a single tool, not a whole class of nodes
- that string will get copy&pasted around with the node, autolabel event handlers remain separate from your nuke scripts (the latter has its advantages of course when it comes to maintainability and preventing your pipeline’s code from leaving your company)
- the knob can be used with groups and node presets. All groups share the same class so it’s not possible to single one of them out.
autolabel event handlers:
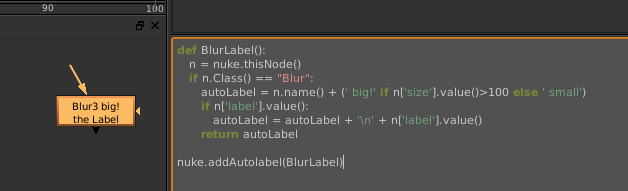
To finish this tutorial, here’s the autolabel event handler that corresponds to the knob monstrosity above. It needs to be placed into your menu.py (or any python modules that are imported). You can have multiple autolabel handlers so you don’t need to cover all node classes in one function. Nuke calls all of them in a row and uses the first one that doesn’t return None.
def BlurLabel():
    n = nuke.thisNode()
    if n.Class() == "Blur":
        autoLabel = n.name() + (' big!' if n['size'].value()>100 else ' small')
        if n['label'].value():
            autoLabel = autoLabel + '\n' + n['label'].value()
        return autoLabel

nuke.addAutolabel(BlurLabel)
Patching Your Pipeline
Recently, our studio’s file server started failing randomly. We lost Nuke scripts and we also lost the autosave files that Nuke creates in the same directory. Of course there are ways to deal with that on lower levels but I needed a quick fix that I could deploy without dealing with infrastructure and file system journals. Fortunately, Nuke provided the means to do that. I managed to redirect autosaves to each artist’s local drive without even accessing their machines. Here’s how:
Nuke has a bunch of callbacks that you can use. And it also has some that relate to autosaves:
- AutoSaveFilter (called whenever Nuke wants to write to an autosave file)
- AutoSaveRestoreFilter (called whenever it wants to check or read an autosave during startup)
- AutoSaveDeleteFilter (called before an autosave gets deleted).
All of these functions receive the file name of the autosave that Nuke would use if you hadn’t installed any event handlers. The expected return value is a modified file name that it will actually use.
The whole idea is simple: diverting autosaves whose paths match a certain pattern (I only want to catch those that would have been saved on our file server) to a clone of the server’s folder structure on the artist’s local drive. We’re running Linux so I chose ~/Documents/NukeAutosaves as a location.
As an extra failsafe against data loss I made a copy of an autosave right before Nuke deletes it. This makes sure that each artist gets an automatic copy his .nk script on his local drive. This script may not be the same as the .nk file that is saved on the server, but since it is identical to the last autosave, it’s definitely a helpful backup.
Here’s the Python code that you need to paste into your init.py or include it as a separate module (which I recommend):
import os, re, shutil
import nuke

def onAutoSave(filename):
  """Build local autosave file name for saving."""
  localfilename = os.path.expanduser(re.sub(r"/PATH/TO/SERVER/", r"~/Documents/NukeAutosave/", filename, re.IGNORECASE))
  localdir = os.path.dirname(localfilename)
  if not os.path.isdir(localdir):
    os.makedirs(localdir)
  return localfilename

def onAutoSaveRestore(filename):
  """Build local autosave file name for restoration."""
  return os.path.expanduser(re.sub(r"/PATH/TO/SERVER/", r"~/Documents/NukeAutosave/", filename, re.IGNORECASE))

def onAutoSaveDelete(filename):
  """Create a backup copy before deleting an autosave."""
  # only delete untiled autosave
  if nuke.root().name() == 'Root':
    return filename
  # build local autosave file name
  localfilename = os.path.expanduser(re.sub(r"/PATH/TO/SERVER/", r"~/Documents/NukeAutosave/", filename, re.IGNORECASE))
  # before Nuke deletes it, make a backup copy (without the .autosave extension)
  try:
    if os.path.isfile(localfilename):
      shutil.copy2(localfilename, os.path.splitext(localfilename)[0])
  except Exception as e:
    print "Exception thrown in onAutoSaveDelete(): %s" % e
  return localfilename

def init():
  nuke.addAutoSaveFilter( onAutoSave )
  nuke.addAutoSaveRestoreFilter( onAutoSaveRestore )
  nuke.addAutoSaveDeleteFilter( onAutoSaveDelete )

init()
Our file server was of course fixed soon after I had deployed this hotfix. But I have left it in our pipeline since then because it solves another autosave problem: bogus autosaves created by other users.
Whenever someone else opens your script without saving (maybe a supervisor or just another artist who needs to borrow part of your setup) he’ll leave behind an autosave. These files are potentially dangerous. Nuke will ask you to restore from this autosave but what if it contains changes that mess with your script or even break it? The guy who previously opened your comp didn’t mean any harm and he didn’t save his changes. But now you’ve restored his autosave and by subsequently hitting “save” you might have damaged your script permanently.
The hotfix I have shown above will divert all autosaves to local machines. So when you open a script, Nuke will never find an autosave that somebody else has created or left behind.
TCL string magic
Here’s another small expression for Nuke. I wanted to burn in a read node’s current frame number using a Text node. It’s easy to get the current image’s source file name from the input’s metadata. But can you extract the frame number from a string like “/server/path/filename.01234.exr”?
Sure! This expression splits the file name into parts separated by the dot character. The 2nd part (index 1 in tcl) is the number we’re looking for:
[lindex [split [metadata input/filename] "."] 1]
A text node with this expression is useful for Hiero burn-ins by the way…

Nuke Python Expression Switch
Nuke’s Python expression syntax can be shorter and more readable than tcl.
Imagine, you want to use a switch to toggle part of your comp on or off on certain frames – maybe to fix artifacts in a 3D pass. Instead of animating a switch’s input or a tool’s mix slider between 0 and 1 you could use an expression:
frame == 1025
This will set the knob to 1 on frame 1025 and to 0 anywhere else. An expression like that also works if you want to enable that knob on several frames, but it gets increasingly unreadable:
frame == 1025 || frame == 1072 || frame == 1074
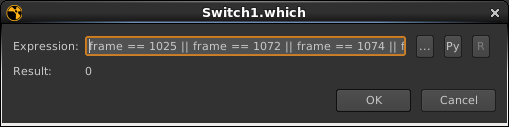
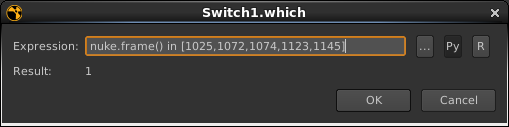
A Python expression is shorter and easier to extend. Enable the Py button in the expression popup and there you go:
nuke.frame() in [1025,1072,1074]
Logarithmic Conversion in Nuke vs. After Effects
If you ever need to use the Cineon Converter effect in After Effects… you know, maybe you want to create a LUT adjustment layer to match your real comps… you might save yourself some time by remembering this:
Nuke’s default log2lin gamma of 0.6 is like 1.0 in After Effects.
This concludes my public service announcement.
Countdown #6
Another video for the Fusion webinar countdown.
httpvh://vimeo.com/76365091
You can download the comp here. You’ll need one of my fuses and Krokodove 5.70 alpha as well as this font.
Music: Berry Nuggons by EAT! (cc-by)