Free Software Advent 2025
This post is a recap of my Mastodon series for #FreeSoftwareAdvent 2025! The hashtag is/was about free and open-source software that we rely on every day (although I didn’t manage to post every day). These are the FOSS tools and apps I’m using at work for our VFX pipeline. The links below are pointing to my Mastodon posts where you can find more information about the applications and a link to their respective homepages:
5th: OpenImageIO — modern library and tools to read/write all kinds of image formats
7th: DokuWiki — self-hosted wiki solution for our intranet knowledge database and documentation
9th: gitea — self-hosted git server (think gitlab/forgejo/codeberg/github)
11th: OpenZFS — powerful copy-on-write filesystem that is the base for TrueNAS
13th: pyRenamer — small GUI tool to rename a collection of files
14th: mongodb — json document database (“NoSQL”)
15th: OpenColorIO — color-management and color conversion toolkit used across all DCC apps
17th: Ansible — powerful tool to configure and control your whole IT infrastructure
19th: ffmpeg — *the* open-source video encoder/decoder
21st: Zulip — self-hosted chat system
24th: Linux & Python — the obvious essentials
Things I forgot
Of course there are many more essential open-source tools that I use regularly or that our VFX pipeline relies on: LibreOffice, Inkscape, Gimp/Krita, Redict (a fork of the Redis database), Borg backup and Borgmatic (encrypted backup solutions), Syncthing (UDP-based file synchronisation), Podman, KeepassXC, ….
New Syntheyes – Better Fusion Support
A new version of Syntheyes just has been released. It features updates to the Fusion export script, including contributions that I had made a while ago.
Since Fusion doesn’t support the Syntheyes distortion model by itself, Syntheyes will set up a UV map distortion/undistortion workflow for you on export. In my experience, the image quality might suffer a bit with strong distortion values since there’s no sub-sampling, but this technique has many advantages. One being the fact that it automatically contains the undistorted image’s resolution that you need for 3D via the UV map.
Fusion / Syntheyes Bridge
A while ago I’ve blogged about the planar tracking features of Syntheyes and I’ve finally made some updates to the Fusion exporter to support them. In addition to that, I’ve played around with the Python support in Syntheyes and I’ve written a script that can create and update (!) a comp in a running Fusion instance. This saves you a lot of hassle if you have tweaked a matchmove or added trackers to a point cloud but you don’t want to export a composition from scratch!
httpvh://www.youtube.com/watch?v=1j6os9nfs0g
The package consists of three scripts: an advanced exporter for Syntheyes, a Python script for Syntheyes that is able to create and update tools from a matchmove (camera, point cloud, planar trackers) and a small tool script for Fusion that sets up a Syntheyes project from a selected Loader. Syntheyes Pro 2013.11 or later required for the Python scripts. Readme included.
The Fusion6 exporter is based on the Fusion5 script that ships with Syntheyes and has been updated in many ways:
- support for stereo camera pairs
- support for planar trackers (with or without planar export preparation script)
- work area (timeline) options as in AfterEffects exporter
- Create locked cameras to prevent their accidental modifications
- Added project info to comp’s comments tab and footage name to camera’s comments
- various fixes like paths and obj meshes
- convert paths to a Windows format when running Syntheyes on Mac/Linux
Download the Syntheyes / Fusion bridge here.
Logarithmic Conversion in Nuke vs. After Effects
If you ever need to use the Cineon Converter effect in After Effects… you know, maybe you want to create a LUT adjustment layer to match your real comps… you might save yourself some time by remembering this:
Nuke’s default log2lin gamma of 0.6 is like 1.0 in After Effects.
This concludes my public service announcement.
Syntheyes Planar Tracking
These videos showing the new 3D planar tracking capabilities of Syntheyes have convinced me to invest in an upgrade:
Speaking of which… I have recently uploaded an updated Fusion export script for Syntheyes to vfxpedia. I wrote it a year ago and submitted it for inclusion but so far, Syntheyes is still shipping with that really old Fusion 5 exporter (which works but is lacking a few features). Here’s what I’ve changed:
- Support for stereo camera pairs
- Create locked cameras to prevent their accidental modifications
- Added project info to comp’s comments tab and footage name to camera’s comments
- Fixed cross-platform problems for object paths in FBXMesh
- Generate meshes that are positioned correctly when imported into Fusion.
- Nodes aligned to grid and spaced for tile pictures
- Disabled clip lists in Loader, fixed length calculation and supported QuickTime
- Updated input names of 3D tools (SceneInput and Output instead of “Data3D”)
- Characters other than alphanumeric letters are invalid in node names and will be replaced by “_”
All of it is based on the Fusion 5 script (C) Russ Andersson and is provided AS IS without any warranty.
Download fusion6.szl here and put it into Syntheyes’ user scripts folder.
Looking at the latest exporters for AfterEffects, I can see that this script might still not be up to par so I’m currently revamping the script to fix some bugs and add support for planar trackers.
Still, the connection between Fusion and Syntheyes ought to be much closer as both support Python scripting now! My plan is to write some scripts for both applications so they can share cameras and point clouds much more seamlessly. Let me know if you have ideas on how to approach such a workflow! For starters, I was thinking of a “Track This” tool script for Fusion that sets up a scene in Syntheyes.
update 03/2014: I’ve released such a script.
Add Tool improvement for Fusion
Here’s an update for Fusion’s Add Tool script that makes it remember your favorite tools. This way you will never again get confused by similarly named tools that you never use. These favorites get written to disk into your profile directory so they persist whenever you restart Fusion.
The popup also lists macros and scripts and it makes 3rd party tools or Fuses easier to spot by printing their vendor ID as well (e.g. “Fuse” or “KD” for Krokodove plugins).
Tool favorites are preselected and marked with a number of stars based on their popularity. Press ctrl-U to reset the counters.
The changes I’ve made are based on the work of Andreas Opferkuch (who made an improved version of Add Tool called Add Anything) and the new substring matching that lets you skip letters is based on the Nuke script “tabtabtab” by Ben Dickson.
Download the script here and place it into your comp scripts folder:
Add Tool X.eyeonscript
Installation.
To launch this script instead of Add Tool you need to modify your Fusion.hotkeys file. The default Add Tool script is bound to Ctrl-Space. If you use Nuke as well you might prefer the Tab key instead. Put this block into Fusion.hotkeys (use the Flow section instead of Frame because the Tab key is already used in the viewers or the control panel…)
Flow = {
   TAB = "@Scripts:Comp/Add Tool X.eyeonscript",
}
How to use it:
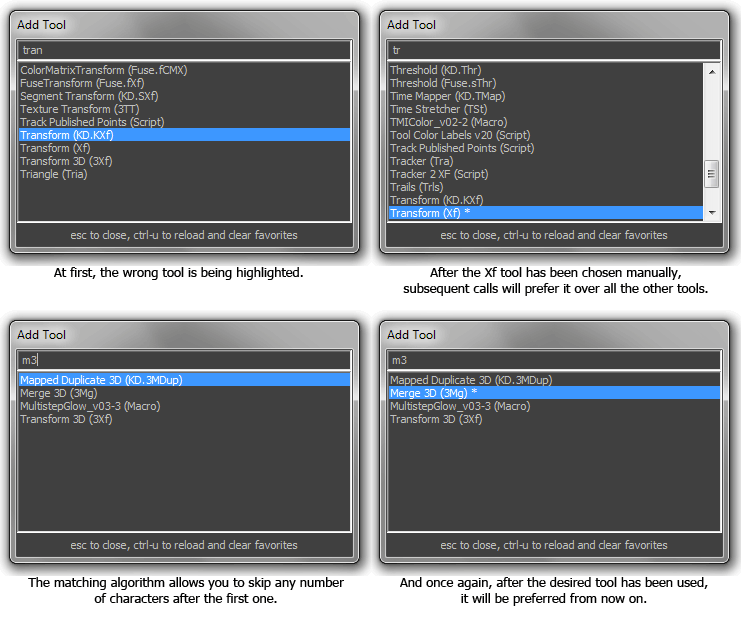
After launching the popup using your preferred hotkey, start typing. As with the original Add Tool script, the list of tools will be restricted to those that contain the string you’ve entered. However, some tools have very similar names and the wrong tool might be selected until you type the complete name of a tool. For example, ‘tra’ will match the Tracker before the Transform tool. This isn’t exactly speeding up your workflow!
Add Tool X will keep track of all the tools you spawn so once you have manually chosen Transform over Tracker, it will prefer Transform from now on. Unless you have spawned other tools starting with T, Add Tool X will even offer you Transform as soon as you enter the letter T! Your favorite tools are also sorted to the top of the list which means that the second most popular tool is always just a cursor key away.
Non-Consecutive matching.
Inspired by “tabtabtab“, Add Tool X sports a smart letter matching system that allows you to skip letters as long as the first character matches your desired tool’s name. For example, m3 will match “Merge 3D” or trk matches the “Tracker”. You’ll quickly figure out your own unique shortcuts to your favorite tools that don’t clash with other tool names. Note that you can still rely on the standard substring matching which doesn’t allow you to skip letters but on the other hand doesn’t require you to start with the first letter. This is why, in the screenshot above, m3 also matches “Transform 3D” (spaces are always ignored). You can start typing a tool name with a capital letter to turn off the non-consecutive matching altogether.
Advanced options.
The script also has a bunch of flags that you can adjust using a text editor:
-- show the helpful label at the bottom of the popup?
SHOW_LABEL = true
-- pop up where the mouse is
CURSOR_POPUP = true
-- disable to hide macros
SHOW_MACROS = true
-- disable to hide scripts
SHOW_SCRIPTS = true
-- put favorites to the top of the list
SORT_BY_POPULARITY = true
-- cache macros and scripts (off by default)
CACHE_MACROS_AND_SCRIPTS = false
Als ich einmal einen Film schauen wollte…
 Auch wenn ich in der Filmbranche arbeite habe ich selten Zeit oder Lust auf Kino. Da wollte ich doch mal sehen, ob ich “Hänsel & Gretel” bequem vom Laptop aus anschauen kann – besonders weil ich damit rechnen muss, dass der Film ja doch nichts taugt. Also, iTunes Store aufgemacht und dann das…
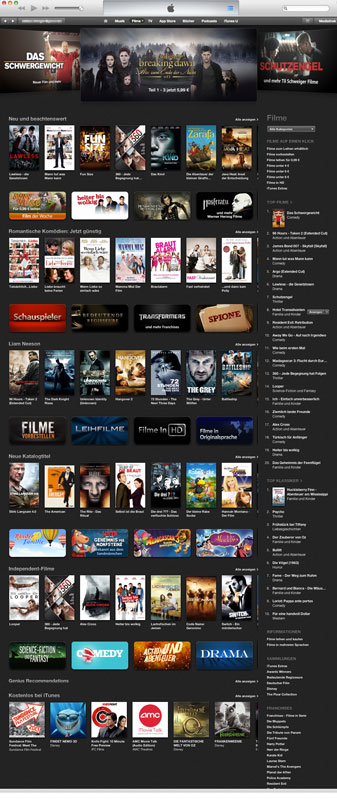
Gibt’s eigentlich eine Möglichkeit, das ganze NOCH unübersichtlicher zu machen? Ein Layout mit Zeilen und Spalten, Thumbnails in verschiedenen Größen, jede Zeile kann ich auch nochmal horizontal scrollen.
Es scheint einen Unterschied zwischen “Leihfilmen” und “Filmen in HD” zu geben – und wenn ich auf “Leihfilme” klicke wird das ganze noch schlimmer. Eine Thumbnail-Wüste ohne Einteilung in Genres oder Qualität wird einfach über mir ausgekippt. Das ganze ist schlimmer als damals in einer Videothek, bei der man auch ewig durch die Regale gegangen ist und Meterweise Straight-to-VHS-Schund durchforsten musste. Und es ist ja nicht so als wäre das Angebot hier besser. Die Mainstream-Soße von Twilight und Till Schweiger wird oben groß gefeatured. Wer weiß ob es gute Filme in der Thumbnail-Wüste irgendwo gibt. Lust, danach zu suchen habe ich nicht. Dabei hab ich noch nichtmal über das Preismodell gesprochen.