Linear Gamma in Fusion Part 2
In part one, I have written about viewer LUTs to aid my linear gamma workflow. This part provides an example of the complete workflow (without CGI) and talks a bit about the basics. For starters, lots of people have already explained the issue of gamma quite nicely so I’ll make it short, skip the history and relate things to Fusion.
This article is part of a series of articles dealing with color workflows in Fusion. Other parts:
Linear Gamma Workflow Part 1 and Rendering rec709.

How to setup a linear workflow in Fusion (click to enlarge) – update: you can also use the “Select View LUT Plugin” comp script to save your LUT settings
Image Editing is Math
Color corrections, image warping… everything. In math, you rely on basic assumptions, for example that 1 + 1 = 2. A more specific example that relates to VFX is this: if you take two photos with a camera and for the second take you open your shutter twice as long as before, twice the amount of light will be “recorded” and the resulting image will be twice as bright. In other words, every pixel’s value should be twice as much as before. Fusion is using algorithms that expect this to be the case – as does every other image editing and rendering software out there. They expect a pixel that is twice as bright to have twice the RGB values.
So what’s the big deal? Well, the problem is that every image that looks alright inside an image viewer, a webbrowser, Photoshop, Premiere or Fusion doesn’t obey this premise. The files all have their RGB values warped (due to reasons going back to the beginnings of computer graphics and CRT monitors) to look normal to our eyes when viewed on a monitor. But if computer programs are looking at the raw numbers, assuming that twice the RGB means twice the brightness, they are mistaken. Their algorithms result in 1+1 = 3.
Try it yourself. Increase the gain of a photo by a factor of two. All the color values will be twice as high but the image looks very blown out – not like a photo that has been taken with half the shutter speed (or twice the aperture). This is why you’ve been adding one color correction after another, tweaking curves, creating masks for highlight areas and doing all kinds of nasty stuff to an image. You’ve unknowingly been doing math in a universe where 1+1 = 3.
Gamma Correction
 I haven’t used the word gamma yet. In very simple terms, it’s a measurement of how much the color values of an image have been warped and if you read up on it you’ll quickly end up with figures of curved lines, formulas and jargon. Let’s use language a compositor would use (but don’t try to impress your TD, colorist or resident math geek):
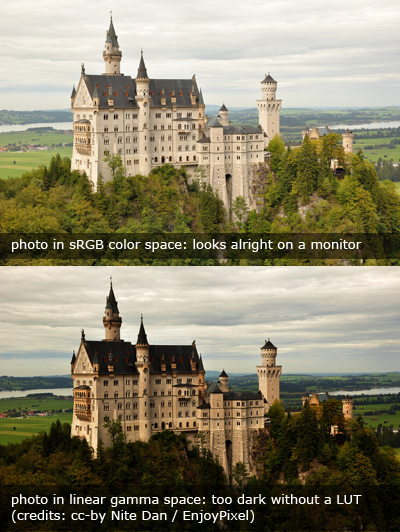
An image like the first one to the right that looks good on your monitor by default, i.e. one with warped RGB values, has “gamma”. You need to “remove gamma” or apply a “gamma correction” using a BrightnessContrast or Gamut tool to bring the values back into a dimension where the image is “linear”, i.e. where 1+1=2. Fusion’s algorithms are happy now, your color corrections and defocus effects look much more realistic but oh my… the image is way too dark. But nevertheless, in this dark image, an object that has twice the RGB values really has emitted twice the amount of light towards the camera. Again, this is simplified since digital stills cameras are made to produce visually pleasing jpegs, not physically correct ones.
At the end of your comp, you’ll have to “add gamma” or convert the image back into a “color space” that is suitable for your target audience who will need to see the image with warped RGB values so it appears correctly to human eyes.
Working Linear by Example
The workflow problem that arises is obvious: How do you work on an image if what is being displayed is unnaturally dark? Enter the LUT button. A LUT is a color correction that is applied on-the-fly, just for the viewers, usually in real-time on your GPU. It doesn’t modify the image data of your comp in any way. There are basically two gamma corrections that make sense for a basic linear workflow: sRGB and ITU-R BT.709 (rec709). Both brighten up a linear image for human consumption and differ slightly in perceived brightness (or rather “gamma”).
You should use the same LUT that was used to linearize your footage. If there are no specifications from your grading or editing department, you can’t go wrong with sRGB – although rec709 makes the image appear a bit darker and will prevent you from crushing the blacks too much. But unless you’re working on a calibrated broadcast monitor and know exactly what your editing or grading department and broadcast station does to your images, neither LUT will give you certainty about how it will look to other people. If your task is simply to add something to an otherwise unchanged plate it also doesn’t matter which LUT you’re using as long as you’ve linearized your footage and you’re working in floating point.

Here’s an example comp that demonstrates a feasible linear workflow. It uses a photograph to demonstrate how a defocus produces photorealistic results when applied with linear gamma. It also includes the ViewShaders from my previous post. The next part of this series will discuss CGI and “illegal” operations in linear space.