Bret Victor – Inventing on Principle
Now that’s some eye-opening ideas on how programming could be like if we broke free from the decades-old paradigm of writing code in a text editor, compiling, looking at the result, modifying code, ad infinitum.
Instead, Bret Victor proposes an IDE that not only executes your code while you type, but also clearly shows you what’s going on in your algorithm without you having to insert debugging statements everywhere.
http://vimeo.com/36579366
He takes it further into designing electronic circuits, where software is replacing pen & paper while keeping the heritage of a pen & paper world of yesteryear. The circuit designer still has to simulate and anticipate the effects of his design in his head.
Invest 40 minutes of your time. It’s worth it 🙂
Resident Evil WTF?!
Hier ist der Trailer zur neuesten Inkarnation der anscheinend niemals endenden Resident Evil-Reihe. Nicht dass ich überhaupt wüsste, bei welchem Teil wir inzwischen angelangt sind. Die Macher wollen auch gar nicht, dass man mitzählt. Stattdessen konkurrieren sie mit “Underworld” um Beiworte: Retribution. Revolution. Re… was auch immer.
Ich will auch gar nicht darüber spekulieren, was für ein Crap der Film vielleicht wird – der Trailer spricht für sich und die YouTube-Kommentare zeigen, dass es dennoch genug Zuschauer gibt, die das ganze aufsaugen, um weitere Teile zu rechtfertigen. That’s business, und wo soll die gute Milla denn sonst mitspielen, wenn nicht in Filmen, die ihr Ehegatte für sie schreibt und produziert.
Aber wo ich mich vor Lachen weggeschmissen habe, waren die unglaublich schlechten VFX in einer Szene. Ich kann nur hoffen, dass das Zeug noch work in progress ist (nicht unüblich für frühe Trailer), und dass ich keinen Arbeitskollegen unwissentlich auf die Füße trete 🙂 Denn diese Shots sehen sowas von billig aus, das kriegen Leute auf YouTube mit AfterEffects besser hin.
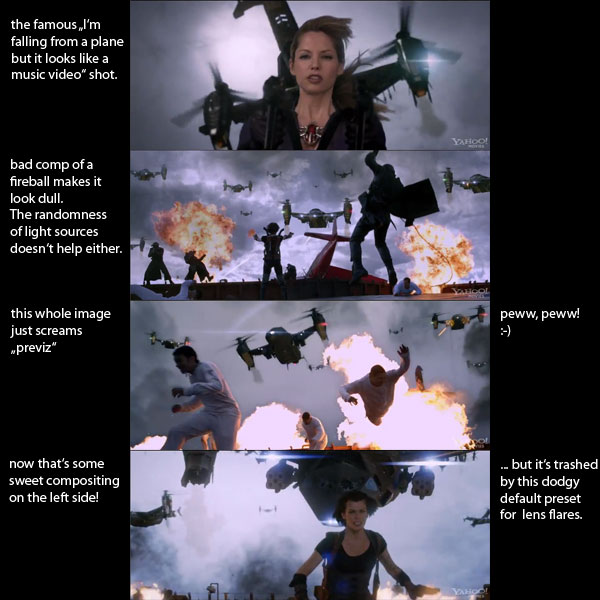
Man beachte die stumpfe halbtransparente Explosion im 2. Bild, überhaupt die ganze seltsame inkonsistente Lichtstimmung aus Studiolicht-Greenscreen-Menschen und einem Wolkenfoto im Hintergrund, das sämtliche Perspektive vermissen lässt.
Das dritte Bild: keinerlei Tiefeneindruck, die hintersten Flugzeuge so crisp wie die vorderen… Dazu die heutzutage obligatorischen horizontalen Star-Trek-Lensflares auf jeder Scheißlampe, die aber im Gegensatz zu anderen Trash-Filmen wie BattleShip ein Schritt zurück in die 90er-Jahre sind. Im letzten Bild kommt der überbelichtete Himmel dagegen sehr gut, auch wenn die Explosionen einen kitschigen Glow drauf haben. Ich verweise nur auf einen früheren Blogeintrag zum Thema “realistische Explosion“.
Fusion Script and Macro Collection
I’ve noticed quite a few Google hits for Fusion on my blog, so I thought I’d write a short summary of various scripts and macros I have created over the years.
Note: Since Fusion was aquired by Blackmagic Design, vfxpedia has been turned off and thus many links no longer work. Besides that, Fusion 7 introduced a new LUA interpreter that requires changes to some scripts. If a script no longer works in Fusion 7.x or you need a Fuse or Macro that was hosted on vfxpedia, drop me a line or visit the forum at steakunderwater.com/wesuckless where I might have already posted an updated version.
Scripts
- A huge improvement to the Add Tool script.
- Exporting keyframe data to After Effects
- Importing keyframe data from Nuke
- Saver Checker Script that creates missing output directories and lists enabled savers (useful if there are a lot of them).
- Loader From Saver creates or updates a loader from a selected saver.
- 3-Point-ImagePlane, a script that automatically aligns 3D planes to vertices in a point cloud.
- Freeze Cam, a helper script for projections that duplicates a camera and removes its animation.
- Tool Color Labels to easily tag your flow.
- Invert Animation Curve, a script that swaps time and value of an animation spline.
- An improved version of Fusion’s “Change Paths” to do search&replace operations on your loaders and savers.
- An improved version of “Destabilize Transform” to connect trackers to almost anything that has a center, size and angle slider.
- An improved Python implementation of the Bake Animation script, that processes multiple properties at the same time.
- Un-Modify, a tool script to remove modifiers from a stack without killing the whole animation.
- A converter to use Syntheyes lens distortion values with Fusion’s LensDistort tool.
- A suite of scripts to exchange shots between Fusion and Syntheyes.
More scripts and script-related snippets can be found on Vfxpedia, by the way.
Macros
- A 3D Colorspace Keyer implementation.
- ExponentialGlow, a glow with a nice photorealistic falloff.
- Image Mixer to help with applying scanned grain from gray cards.
- Macros to apply Lustre(R) merry grades, Josh Pine’s log2lin math and Nuke-inspired TMI color balance.
- An implementation of Nuke’s Ramp tool for gradients.
- A Color Picker that can be placed on top of an image to serve as a persistent color readout which has since been improved by Gregory Chalenko.
- SoftClip, a macro to gently compress overbright values below 1.0.
- SigmoidalContrast creates an S-shaped contrast curve.
- SpillMerge, an advanced keying solution for smoke or reflections.
- “Toe”, a macro to gently raise an image’s black level (inspired by Nuke’s tool of the same name)
- “Turn” for rotating an image (including its canvas) in steps of 90 degrees.
Fuses
- Open-Source Plugins to create Lightning Bolts, Lens Flares or Lines
- GPU-accelerated Rolling Shutter correction based on motion vectors from eyeon’s Dimension plugin.
- A Smoothcam-inspired Fuse to automatically stabilize or smooth a shaky camera move.
- CubeToLatLong turns a cube map into (part of) an equirectangular panorama.
- SparseColor draws gradients or fills an image using multiple spots of color.
- A Nuke-like color correction Fuse whose contrast slider works well on linear images.
- A GPU-accelerated CornerPin, an improvement over Fusion’s native tool.
- A Switch Fuse as found in Shake or Nuke.
- A Fuse to manage auxiliary channels (like depth or vectors).
- A clone of Nuke’s Reformat tool to fit an image into another image format.
- A modifier for averaging two or four point positions (e.g. trackers)
- PositionHelper, a modifier to easily smooth a tracker path or change its reference frame.
- XfChroma, a transform tool that leaves a colorful trail.
All scripts and Fuses are open-source (mostly BSD-style) and commented extensively to serve as scripting tutorials 🙂 Feedback is always welcome.
A Better Corner Pin for Fusion
 Nowadays everything is about 3D matchmoving, but 2D corner pinning still has its uses. Unfortunately, Fusion’s corner pin tool is quite limited compared to the same tool in Nuke. For example, you’re only able to move the corners of the source image. If you need to define your distortion using different source coordinates, you’ll have to put a “perspective positioner” before the corner pin which degrades image quality in most cases. Moreover, you need to use all four corners. iPhone-like pinch&zoom effects, where you pin just two or three points can’t be done.
There’s an alternative tool which is part of the great Krokodove plugin set, but it’s outdated as well since it doesn’t support DoD and it lacks the fine-tuning offsets that the original Corner Pin has. They help you a lot on stereo shots where you want to offset all four corners from one eye to the other.
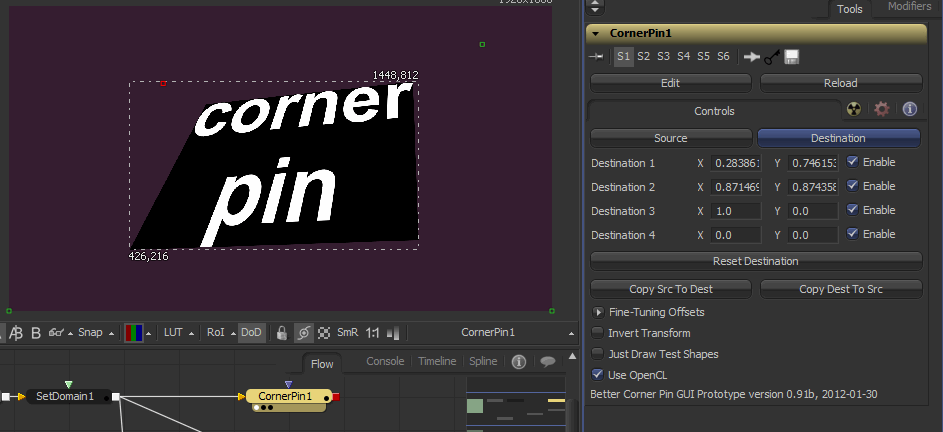
Long story short: I’ve researched some matrix math and turned what was meant as a GUI prototype into a fully OpenCL accelerated Fusion plugin (works without a GPU as well of course).
I’ve learned a lot about how to write Fuse plugins (proxy mode, DoD, OpenCL kernels) and had some helpful feedback on from other Fusion users. To give back to the community, the code is commented extensively and available under a BSD license.
Download BetterCornerPin_v1_6.Fuse or check out the manual at Vfxpedia. You need at least Fusion 6.31 due to continued improvements of the Fuse API.
Some features couldn’t be implemented in a Fuse: concatenation with other transform nodes or some more helpful overlays in the viewers. You’d need to write a C++ plugin.
Normals, Matrices and Euler Angles
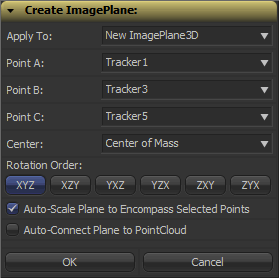 Fusion can import point clouds from a 3D camera track, but there’s no easy way to align an image plane to three points in space. If you want to place walls or floors for camera projection setups, this makes for a tedious task of tweaking angles and offsets. So, I’ve been dusting off my math skills, especially transformation matrices, to write a script that allows you to place an ImagePlane3D or Shape3D with just a few clicks.
It’s a tool script that goes into your Scripts:Tool folder. You need to select a PointCloud3D before running it. Unfortunately, there’s no way for the script to know which points of the point cloud you have already selected 🙁 You need to hover your mouse over the point cloud vertices after you have launched the script to read their names and select the desired points from a list. The script will, however, remember your choices so you can play around with various trackers quickly and you can choose to apply the transformation to existing planes instead of creating new ones. Here’s a video of the process:
Here’s a script to freeze cameras for projection setups easily.
In case you’re curious: these are the steps that are necessary to solve this problem. Maybe it’s useful to somebody solving the same problem.
- A plane is defined by three points, which we have, but Fusion needs a center offset and three Euler angles move an object in 3D space.
- The center can be chosen almost arbitrarily: any point that lies on the plane is fine. For my script, the user is able to choose between one of the three vertices or their average (which is the triangle’s center of mass). The rotation angles can be deducted from the plane’s normal vector.
- To get the normal vector, build two vectors between the plane’s three vertices and calculate the cross product. This will result in a vector that is perpendicular to the two vectors and thus perpendicular to the whole plane.
- This vector alone won’t give you the required rotation angles just yet. You need a rotation matrix first. According to this very helpful answer on stackoverflow, a rotation matrix is created by three linearly independent vectors. These are basically the three perpendicular axis vectors of a coordinate system that has been rotated. One of them is the normal vector (which is used as the rotated Z axis). The second one could be one of the vectors we used to calculate the normal vector. However, there’s an algorithm that can produce a better second vector, one that is aligned to the world’s XYZ axes as closely as possible. This is useful since the plane we’re creating is a 3D object with limited extends instead of an infinitely large plane.
- The third vector we need can again be calculated using the cross product between the normal vector and the result of the previous step.
- To decompose a rotation matrix into Euler angles, there’s a confusing amount of solutions on the web since there are several conventions: row vectors vs. column vectors, which axis is up and most importantly, what’s the desired rotation order (for example XYZ or ZXY?). Fusion uses row vectors and supports all 6 possible rotation orders, so we’ll go with that. The source code can be found in Matrix4.h of Fusion’s SDK. Moreover, this paper (“Computing Euler angles from a rotation matrix”) explains the process quite well.
Orange Teal Contrast
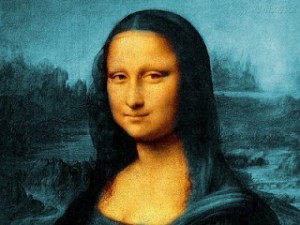 I’ve read an entertaining rant about the apparent overuse of the orange-teal (warm-cold) contrast in contemporary movies. And once your attention has been called to it it’s really kinda impossible not to notice it wherever you look (here’s an overview of movie posters using that particular look).
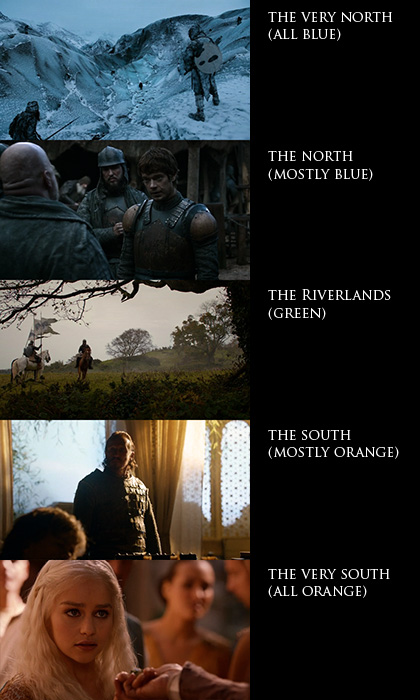 And here are some screen-shots of what is currently my favorite TV show: Game of Thrones. Color temperature serves a clear purpose here. Not only does it give each of the multiple subplots a distinct look, it also serves as a compass as to where on the map the plot is located. Sometimes, however, the orange faces are overdone and make the actors look like Oompa-Loompas. That’s mostly the case in the North where there’s no “natural” orange tones.
Natural, of course, meaning “put there by the props and costumes crew”. Kings Landing, for example, is bathed in orange light but there are still blue hues in the picture (sky, garments and carefully placed specular highlights). In the North, the only natural warm tones are candles so the faces sometimes seem to have been graded towards orange a little bit too eagerly.
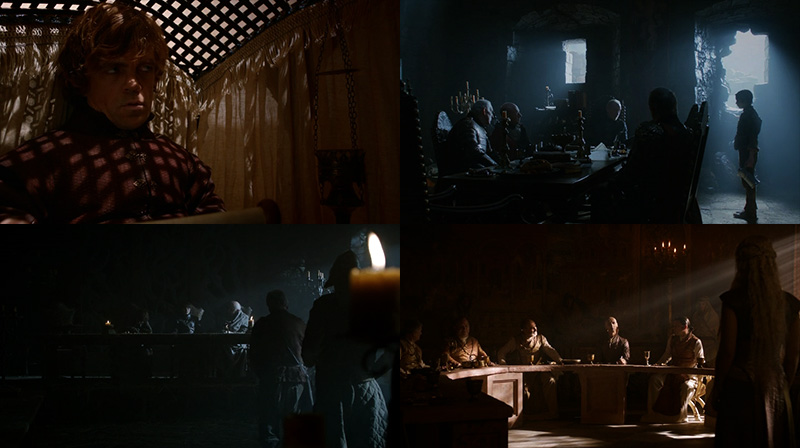
Once you pay attention to light and colors in Game of Thrones, you quickly notice what an awesome job the people involved have been doing. A lot of the show’s high production value stems from the fact that the images look gorgeous throughout each episode. Interior scenes are made to look like they are lit by natural light only which bathes most of the rooms in darkness and helps sell a realistic medieval setting. Color and light also promote specific attributes like poverty/toughness or wealth/decadence: southern cities, it seems, have been blessed by an abundance of sunlight which pushed culture, arts and architecture forward while the northerners seem to fight against mother nature’s cold shoulder each day of their life.
You just can’t imagine portraying the north as a magic-hour landscape while the south is lit by a harsh blue light. Here are some more screengrabs of contrasty, low-key interior scenes:
