Specular Highlights Compositing Reference
Welcome to the first installation of a series where I tell you how to improve your CGI/compositing by looking at frickin mother nature for reference.
Often CGI lacks that last bit of realism. In the case of outdoor surfaces it can be due to the lack of proper specular highlights. They require high sampling rates, they tend to flicker, but it pays off to spend some compositing effort on then – even if you ultimately paint and reproject them manually.
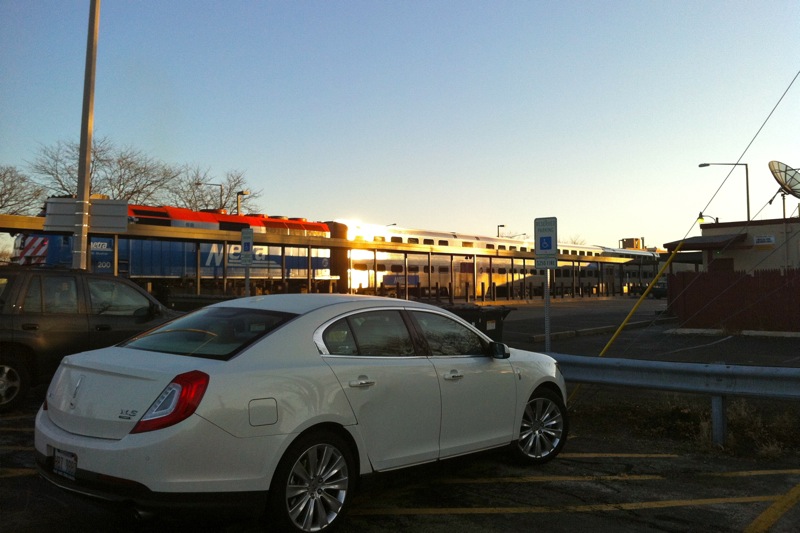
The key to realistic atmospheric effects are proper reference photos. Here’s a photo of one of Chicago’s commuter trains glistening in the morning sun:

The glow that seems to eat away from the steel roof looks like that because it comes from a reflection that’s magnitudes brighter than the rest of the image. To recreate this in comp you need to work in linear color space with values way above 1.0 and a sharp, super-bright yellowish reflection of the sun. Don’t be afraid to go up to 20 or even higher.
Now add a tiny blur to the image (the natural scattering of the air and the lens) so you hardly notice it on most of the image. The bright spot, however, will grow into a large glow not unlike one in the photo (then fine-tune your comp with different blur radii at different strengths or add a blurred luma key of the highlights once more).
Look at the car now. It’s parked in the shadows yet it doesn’t look murky or dark at all. It’s lit solely by the sky’s ambient light which is still bright enough to cause a lot of specular highlights. In reality – and from the point of view of an unbiased renderer like Arnold for example – there is no “specular pass” anyways. It’s all just tiny glossy reflections of a bright light source. And the sky is more than enough. I can’t tell you how to render rims like these but as a compositor you should be prepared to fake some highlights using a normal pass for example if the 3D lacks those details.
Some more thoughts about why the car in this picture looks so well-integrated (yeah, it’s real):
- The color of the highlights matches the sky. Especially the area around the front bumper turns into a mirror-like surface due to the Fresnel properties of the car paint. It matches the sky in color and brightness.
- The sun’s reflection on the train is so bright that it reflects once more in the car’s rooftop. Your raytracer would need to calculate at least two bounces!
- The wheels are black and you can hardly distinguish them from the car’s underside. Yes, clients would tell you they want to see the rubber if this were CGI. But try to balance it. Too much detail in the shadows would make this image look like one of those fake HDR images.
Good read, Stefan! Can you maybe example more on how you would fake highlights with a normals pass ( in Fusion ). Thanx!
good idea. I’ll write something up.
Hi Dunn, since I won’t have time for a blog post or a video, here’s the easiest solution in a nutshell: You can use a macro called P_N_Light_Picker from vfxpedia for fake specular highlights (or any light in general). It’s an easy fake to get specs where you need them.
Thanx alot. I will check it out 😉