Countdown
This is a short clip for eyeon’s Fusion 7 preview webinar in October. Motion graphics artist Dunn Lewis started a countdown series and I’m contributing this clip today:
httpvh://vimeo.com/75164074
It’s 100% Fusion, but using a couple of custom lens flare plugins I wrote. Some relighting is done using a spherical harmonics technique (that’s how I got the smooth shading along the round parts of the text).
Download the comp here. Zip includes my flare fuses as well as the font.
This clip and all the other artists’ work is available on vimeo.
Add Tool improvement for Fusion
Here’s an update for Fusion’s Add Tool script that makes it remember your favorite tools. This way you will never again get confused by similarly named tools that you never use. These favorites get written to disk into your profile directory so they persist whenever you restart Fusion.
The popup also lists macros and scripts and it makes 3rd party tools or Fuses easier to spot by printing their vendor ID as well (e.g. “Fuse” or “KD” for Krokodove plugins).
Tool favorites are preselected and marked with a number of stars based on their popularity. Press ctrl-U to reset the counters.
The changes I’ve made are based on the work of Andreas Opferkuch (who made an improved version of Add Tool called Add Anything) and the new substring matching that lets you skip letters is based on the Nuke script “tabtabtab” by Ben Dickson.
Download the script here and place it into your comp scripts folder:
Add Tool X.eyeonscript
Installation.
To launch this script instead of Add Tool you need to modify your Fusion.hotkeys file. The default Add Tool script is bound to Ctrl-Space. If you use Nuke as well you might prefer the Tab key instead. Put this block into Fusion.hotkeys (use the Flow section instead of Frame because the Tab key is already used in the viewers or the control panel…)
Flow = {
   TAB = "@Scripts:Comp/Add Tool X.eyeonscript",
}
How to use it:
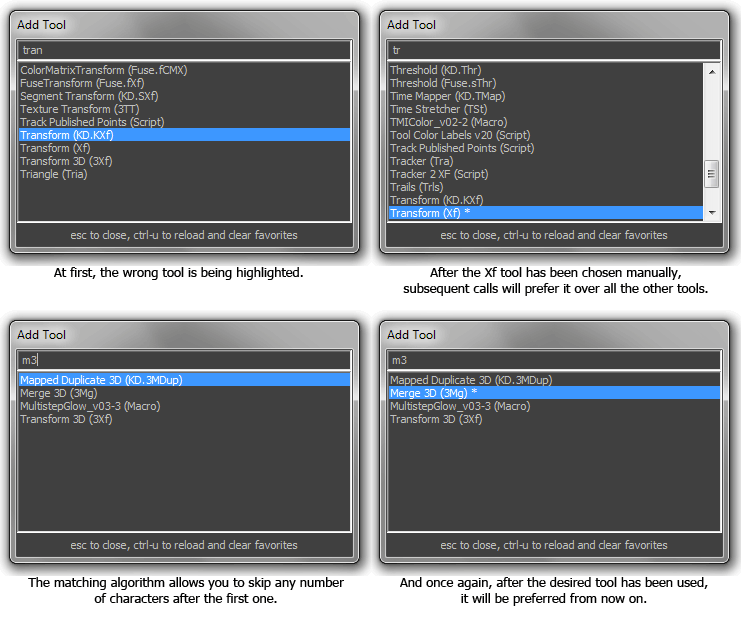
After launching the popup using your preferred hotkey, start typing. As with the original Add Tool script, the list of tools will be restricted to those that contain the string you’ve entered. However, some tools have very similar names and the wrong tool might be selected until you type the complete name of a tool. For example, ‘tra’ will match the Tracker before the Transform tool. This isn’t exactly speeding up your workflow!
Add Tool X will keep track of all the tools you spawn so once you have manually chosen Transform over Tracker, it will prefer Transform from now on. Unless you have spawned other tools starting with T, Add Tool X will even offer you Transform as soon as you enter the letter T! Your favorite tools are also sorted to the top of the list which means that the second most popular tool is always just a cursor key away.
Non-Consecutive matching.
Inspired by “tabtabtab“, Add Tool X sports a smart letter matching system that allows you to skip letters as long as the first character matches your desired tool’s name. For example, m3 will match “Merge 3D” or trk matches the “Tracker”. You’ll quickly figure out your own unique shortcuts to your favorite tools that don’t clash with other tool names. Note that you can still rely on the standard substring matching which doesn’t allow you to skip letters but on the other hand doesn’t require you to start with the first letter. This is why, in the screenshot above, m3 also matches “Transform 3D” (spaces are always ignored). You can start typing a tool name with a capital letter to turn off the non-consecutive matching altogether.
Advanced options.
The script also has a bunch of flags that you can adjust using a text editor:
-- show the helpful label at the bottom of the popup?
SHOW_LABEL = true
-- pop up where the mouse is
CURSOR_POPUP = true
-- disable to hide macros
SHOW_MACROS = true
-- disable to hide scripts
SHOW_SCRIPTS = true
-- put favorites to the top of the list
SORT_BY_POPULARITY = true
-- cache macros and scripts (off by default)
CACHE_MACROS_AND_SCRIPTS = false
Comp-Fu Answers Part 2
Once again I’ve pulled out keywords from my piwik reports!
graphics to rec709 lut
— anonymous
“Graphics” can mean a dozen things. If you have designed some stuff in Photoshop or taken screenshots, for example, they are probably in sRGB. To convert it in Nuke for a rec709 project, just select sRGB in the read node. This will linearize it and if you put on the rec709 LUT you’ll see that it appears a bit darker than in Photoshop. In Fusion, you can convert the image using the Gamut tool (input sRGB, output ITU-B-R.709, both gamma checkboxes enabled).
in fusion for which reason there is no gamma slider??
— anonymous
That made me laugh. All I could think of is this meme 🙂
I guess you mean the nifty viewer controls that Nuke has? You need to add a viewer LUT for this manually. There’s the GainGamma Fuse that ships with Fusion or my gpu accelerated sRGB/rec709 LUTs.
nuke ramp tutorials
— anonymous
Oh come on. What’s next? A tutorial on how to prepare a peanut butter sandwich?!
how many lens flares in total recall
— anonymous
Well, I didn’t count them when I talked about the movie on my blog. But here’s somebody who did!
Comp-Fu Answers Part 1
Welcome to my new show where I answer questions that are based on google searches that brought users to my website. (disclaimer: I’m using piwik for web site statistics and search keywords are transmitted by the user’s browser. It’s anonymous though, so relax.)
what is color space and color temperature
— anonymous
Thanks for your question, Mr Anonymous. Color Space and Color Temperature can be looked up on Wikipedia. In VFX specifically, the term color space usually means the way that a color is being split into separate channels for digital processing. RGB by default (red, green and blue channels). It can be converted back and forth to spaces like HLS, Lab, YUV and so on where you still have red, green and blue channels but now each channel contains a different color attribute. In HLS, the red channel contains a color’s hue, for example.
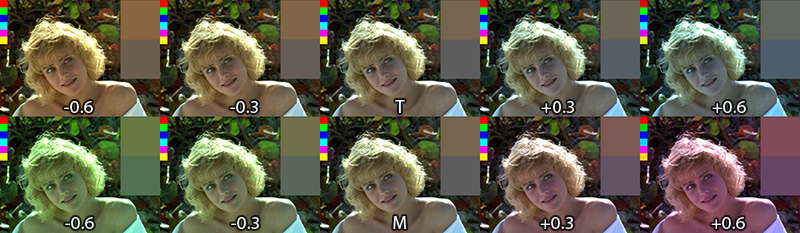
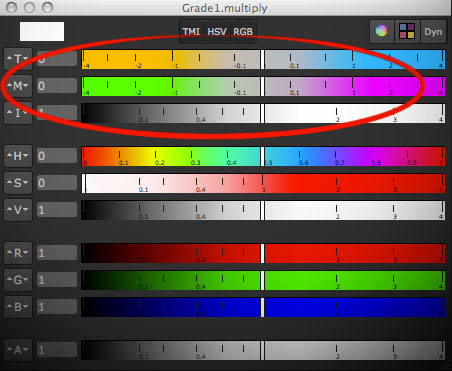
Color temperature is a measure for how cool or warm an image appears (top row of the image). It has a well-defined physical background but basically it’s your white balance setting. It can be adjusted in most RAW converters and although it’s not a color space you can adjust it using the TMI system which includes a magenta-green-value in addition to the orange-blue color temperature axis. It’s available in Shake and Nuke and I’ve made a macro that brings it to Fusion.
color temperature in Nuke
— anonymous
I think there’s no color temperature node in Nuke, but I adjust the temperature of an image using a Gain adjustment:
Open the gain color wheel and enable the TMI sliders if they’re not yet visible. Then, adjust the T slider to your liking. The image might appear brighter or darker now so as a second step, I use the V slider of the HSV group and bring it back to 1.0. This makes sure that the image stays as bright as before (that’s not totally true, but it’s a good rule of thumb. Of course you can tweak every slider to your liking).
I choose the ColorCorrector instead of Grade or Multiply because it has a saturation slider that is applied before the gain and can be used to make the warm or cold tint of an image stronger (if you desaturate the image completely before tinting you’re doing what Photoshop’s Hue/Saturation adjustment calls colorizing the image).
game of thrones color grading
— anonymous
That’s funny. I’m no authority but a while ago I made a blog post on that topic. And coincidentally it involves color temperature 🙂
Light Swoosh
Here’s a quick test for a particle effect done in Fusion.
Music: “Dance of the Gypsy” by Jeris (feat. A.M. mews by MommaLuv SKyTower)
licensed under a Creative Commons license: creativecommons.org/licenses/by/2.5/
You can download the comp here. It demonstrates a few other things like linear gamma, lens flares and glows. You need the Time3D fuse from vfxpedia and the Krokodove plugins.
Lesser-Known Fusion Features
Made another video tutorial:
httpvh://www.youtube.com/watch?v=tJ_yXEZ2OeQ
This one is a quick tour of a couple of lesser-known features in eyeon Fusion: changing the frame step size, proxy footage for loaders, hotkeys for roto, view and subview settings, local render queue, hardware status.
You might already know some of those “secrets”, but they pop up every now and then on forums so I thought I’d collect them into a small video.
Smoothing a Shaky Camera Move in Fusion
Inspired by the Shake “SmoothCam” tool or F_Steadiness in Nuke I’ve written a plugin for Fusion that allows you to automatically smooth or stabilize a shaky camera move. Fortunately I had found a public domain program by a Finn called Jarno Elonen that determines an image’s transformation (scale, translation, rotation) based on a variable number of points. Without knowing anything about “reduced echelon matrices“, “least square fitting” or the “Gauss-Jordan Elimination” (those Wikipedia pages give me the creeps!) I managed to translate the code to LUA and it worked perfectly.
The secret is to interpolate the motion vector image down to as little as 2×2 values. These can then be fed as points to the algorithm. Even my naive approach of using a garbage matte to simply zero vectors that have distracting motion seems to work.
There’s also a video on YouTube about it as well. It’s a demo of my beta version that has an outdated interface but the way of using the Fuse is mostly still the same.
I don’t know how robust it is to various kinds of shaky, jittery, wobbly footage and some GUI decisions might seem odd. But on more than one occasion I was limited by what Fuses can currently do. Still, I think it works well enough to publish it to the Fusion community.
 Download the plugin here: SmoothCam_v1_0.Fuse or read the manual on Vfxpedia. Photo credits for icon: CC-BY Nayu Kim